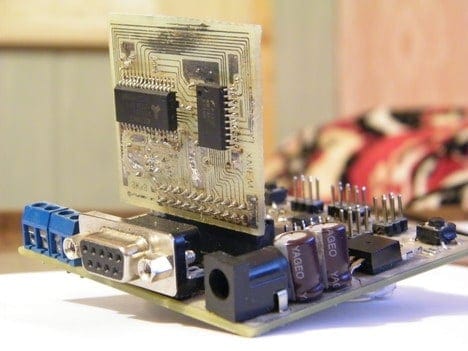
AVR microcontrollers aren’t the best choice to run the FreeRTOS scheduler due to low on-chip RAM. Atmega128 has only 4K of RAM, so this limits the FreeRTOS functionality to very basic. This problem can be solved by adding extra RAM, which may be connected to an external memory interface. We have already built an external memory block of 8K previously to test it with FreeRTOS applications.
Let’s continue with our previous code, which runs several simple tasks (button state reading, LCD output, and LED flash), and we can add more to it. We are going to set up an external RAM for storing heaps. This will allow the storage of large data buffers without worrying too much about heap and stack overlaps.
First of all, we need to take care of the linker options. In AVRStudio5 project properties AVR/GNU C Linker-> Miscellaneous enter linker option:
-Wl,--defsym=__heap_start=0x801100,--defsym=__heap_end=0x8030ff
This will point the linker to use the memory area from 0x801100 to 0x8030ff (whole external RAM) for heap only.
The second step is to set up a microcontroller to use external memory. To make things clean and modular, we will create separate driver source files xmem.c and xmem.h. And write simple XMEM_init() function:
void vXMEMInit(void)
{
    MCUCR |= (1<<SRE);   /* External memory interface enable */
    XMCRA = 0;
    XMCRB |= (1<<XMM1)|(1<<XMM0);//PC7..PC5 released pins
}
At the beginning of the main routine, we simply call this function to initialize external RAM before using it.
Writing USART drivers
We are going to need a USART functionality for debugging and conveniently displaying information. So, first of all, we need drivers that could be used in tasks. Probably the most convenient way to use USART is to send messages through queues. This way, any task could communicate to USART by using messaging service instead of accessing peripheral directly. So we are going to implement two queues – one for TX and another for RX channels.
//receive and transmit queues
xQueueHandlexRxedChars=NULL;
xQueueHandlexCharsForTx=NULL;
Then during USART initialization, we create the queues.
xRxedChars=xQueueCreate(uxQueueLength,(signedchar)sizeof(signedchar));
xCharsForTx=xQueueCreate(uxQueueLength,(signedchar)sizeof(signedchar));
Queue length is given when USART is initialized (30 in our example). Now when queues are ready initially, they can be used to communicate with USART. Messages to queues are put and read through two custom functions that make life easier:
portBASE_TYPE xUSART0PutChar(unsigned char cOutChar)
{
//Return false if after the block time there is no room on the Tx queue.
    if( xQueueSend( xCharsForTx, &cOutChar, xBlockTime ) != pdPASS )
    {
        return pdFAIL;
    }
    //enable usart UDRE interrupt to transmit
    prvUDRIE0InterruptOn();
    return pdPASS;
}
portBASE_TYPE xUSART0GetChar(unsigned char *pcRxedChar)
{
/* Get the next character from the buffer.  Return false if no characters
    are available, or arrive before xBlockTime expires. */
    if( xQueueReceive( xRxedChars, pcRxedChar, xBlockTime ) )
    {
        return pdTRUE;
    }
    else
    {
        return pdFALSE;
    }
}
These functions give additional safety when there are no chars in the receiver queue and when transmit queue is full. As you may noticed there is a private function prvUDRIE0InterruptOn() called in xUSART0PutChar(). This enables USART data ready to interrupt once there is at least one character inside transmit queue.
USART transmit and receive performed through interrupt routines.
ISR( USART0_RX_vect )
{
signed char cChar;
signed portBASE_TYPE xHigherPriorityTaskWoken;

    cChar = UDR0;

    xQueueSendFromISR( xRxedChars, &cChar, &xHigherPriorityTaskWoken );

}
ISR( USART0_UDRE_vect )
{
signed char cChar, cTaskWoken;

    if( xQueueReceiveFromISR( xCharsForTx, &cChar, &cTaskWoken ) == pdTRUE )
    {
        /* Send the next character queued for Tx. */
        UDR0 = cChar;
    }
    else
    {
        /* Queue empty, nothing to send. */
        prvUDRIE0InterruptOff();
    }

}
This is a robust and efficient way of communicating. As mentioned above – transmitter ISR is enabled only when there is data to transmit in the queue. Receiver ISR is only called when any data is present in the RX buffer.
Putting single characters isn’t a convenient way of sending messages. So there are two additional functions that allow sending whole string of text to the queue
portBASE_TYPExUSART0SendData(constunsignedchar*data)
when the string is stored in RAM and
portBASE_TYPExUSART0SendDataP(constunsignedchar*data)
when a message is sent from Flash. In order to save precious RAM it is recommended to store static text messages in Flash memory like:
staticconstuint8_tbutton[]PROGMEM="Button ON\r\n";
This is a pretty basic implementation of USART that works for this demo program. It is worth noticing that implementing different message queues for separate message types like errors; actual data could be a good idea. This way, there is less chance that other messages get mixed inside the queue. We used a single queue for the transmitter as long as it worked fine.
In order to test the USART receiver there is a small code added to the LCD task which simply tests if there is a character received and then displays it on the LCD screen:
if (xUSART0GetChar(&rxchar)!=pdFALSE)
{
    LCDGotoXY(14,0);
    LCDsendChar(rxchar);
}
Creating USART task
As we added a new resource to our list, we can create another demo task that utilizes sending USART messages.
void vUSART0TxTask( void *pvParameters )
{
static const uint8_t button[] PROGMEM="Button ON\r\n";
static const uint8_t rtos[] PROGMEM="Button OFF\r\n";
portTickType xLastWakeTime;
const portTickType xFrequency = 2000;
vUSART0Init(30);
xLastWakeTime=xTaskGetTickCount();
    for( ;; )
    {
if(xButtonSemaphore!=NULL)
{
    if (xSemaphoreTake(xButtonSemaphore, (portTickType)10)==pdTRUE)
    {
        xUSART0SendDataP(button);
        //don't give back semaphore as it is one way trigger
    }else{
        xUSART0SendDataP(rtos);
    }
}
        vTaskDelayUntil(&xLastWakeTime,xFrequency);
    }
}
this task simply takes semaphores from the button task and displays button status every 2s in a terminal window.
XMEM testing task
As we have added external memory to our device, we are going to test its functionality. First of all, we allocate 256 bytes of heap memory with the malloc() function. Then write some dummy data to it and then test if the data are written is correct. This ensures that data is physically written to external RAM. Testing status messages are displayed in the terminal window.
void vXMEMTestTask( void *pvParameters )
{
static const uint8_t xmemok[] PROGMEM="XMEM OK\r\n";
static const uint8_t xmemfail[] PROGMEM="XMEM FAIL!\r\n";
static const uint8_t heapfull[] PROGMEM="Heap Full\r\n";
static const uint8_t heaprdfail[] PROGMEM="Heap Test Fail\r\n";
static const uint8_t heaprdok[] PROGMEM="Heap Test OK\r\n";
portSHORT *xmem;
portSHORT xdata;
unsigned portSHORT index, testflag=0;
portTickType xLastWakeTime;
const portTickType xFrequency = 10000;
    xmem = malloc(BUFFER_SIZE);
xLastWakeTime=xTaskGetTickCount();
    if (xmem!=NULL)
    {
        xUSART0SendDataP(xmemok);
    }
    else
    {
        xUSART0SendDataP(xmemfail);
    }
    for (;;)
    {
        xdata=1;
        for(index = 0; index < BUFFER_SIZE; index++)
            {
                xmem[index] = xdata++;
            }
        xUSART0SendDataP(heapfull);
        //read heap and test
        xdata=1;
        for(index = 0; index < BUFFER_SIZE; index++)
        {
            if (xmem[index] != xdata++)
            {
                testflag=1;
                break;
            }
        }
        if (!testflag)
        {
            xUSART0SendDataP(heaprdok);
        }
        else
        {
            //reset flag
            testflag=0;
            xUSART0SendDataP(heaprdfail);
        }
        vTaskDelayUntil(&xLastWakeTime,xFrequency);
    }
}
Heap memory test is run every 10s.
Running the system
So far we have added two more tasks to our scheduler:
xTaskCreate( vUSART0TxTask, ( signed char * ) "USART", configMINIMAL_STACK_SIZE, NULL, mainUSART_TASK_PRIORITY, NULL );
xTaskCreate( vXMEMTestTask, ( signed char * ) "XMEM", configMINIMAL_STACK_SIZE, NULL, mainXMEM_TASK_PRIORITY, NULL );
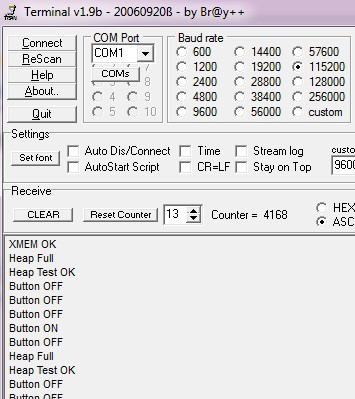
Including idle tasks, we already have 6 tasks running. This is a terminal window view where you can see button status and heap memory test results.
You can download AVRStudio5 project files here (M128RTOS_external_heap.zip).


Awesome! Everything I desired summarised in a very short way.