Embedded Technology and the Modern Market
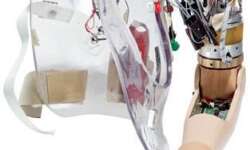
Embedded electronics refer to devices that can be embedded into something. They are add-ons that increase the functionality of the device in which they have been integrated. Embedded electronics can do more, and shortly, it can change the way people sell products and handle business. The Importance of Technology in Business To maximize profits and to increase production but, at the same time, to maintain a competitive price, industries from all sectors of the market rely on technology to reduce the cost incurred during business operations. Modern technology could maximize production and profit by freeing people from repetitive and laborious work and put them in places where their skills and intellect would matter. Technology makes it possible to mechanize and accelerate production, lower the cost, reinforce control mechanisms, speed up delivery, and make goods and services available to more people. These advantages also mean better, cheaper and safer products and services for the end-users.