
TDA7313 audio processor has been used for more than ten years because of its simplicity, functionality, and proper parameters like low distortion and low noise. Chip is based on BIPOLAR/CMOS technology and can be used in various applications, including car radios, Hi-FI, simple mixers.
TDA7313 chip has three external stereo inputs that allow multiplexing three incoming sound sources. It has a volume control with steps of 1.25dB, Treble and BASS control, Loudness function. Each of the four outputs has a distinct control that allows balancing outputs. A chip can be controlled via an I2C (TWI) interface.
Description of Audio processor
This project’s idea was to construct an independent audio processor that can be embedded in any sound system with the ability to control settings with a simple button interface with a menu preview in LCD.

The intent was to cover all audio-processor functionality within the LCD menu.
Circuit and PCB
The circuit diagram is pretty the same as in the datasheet plus the Atmega8 control circuit.
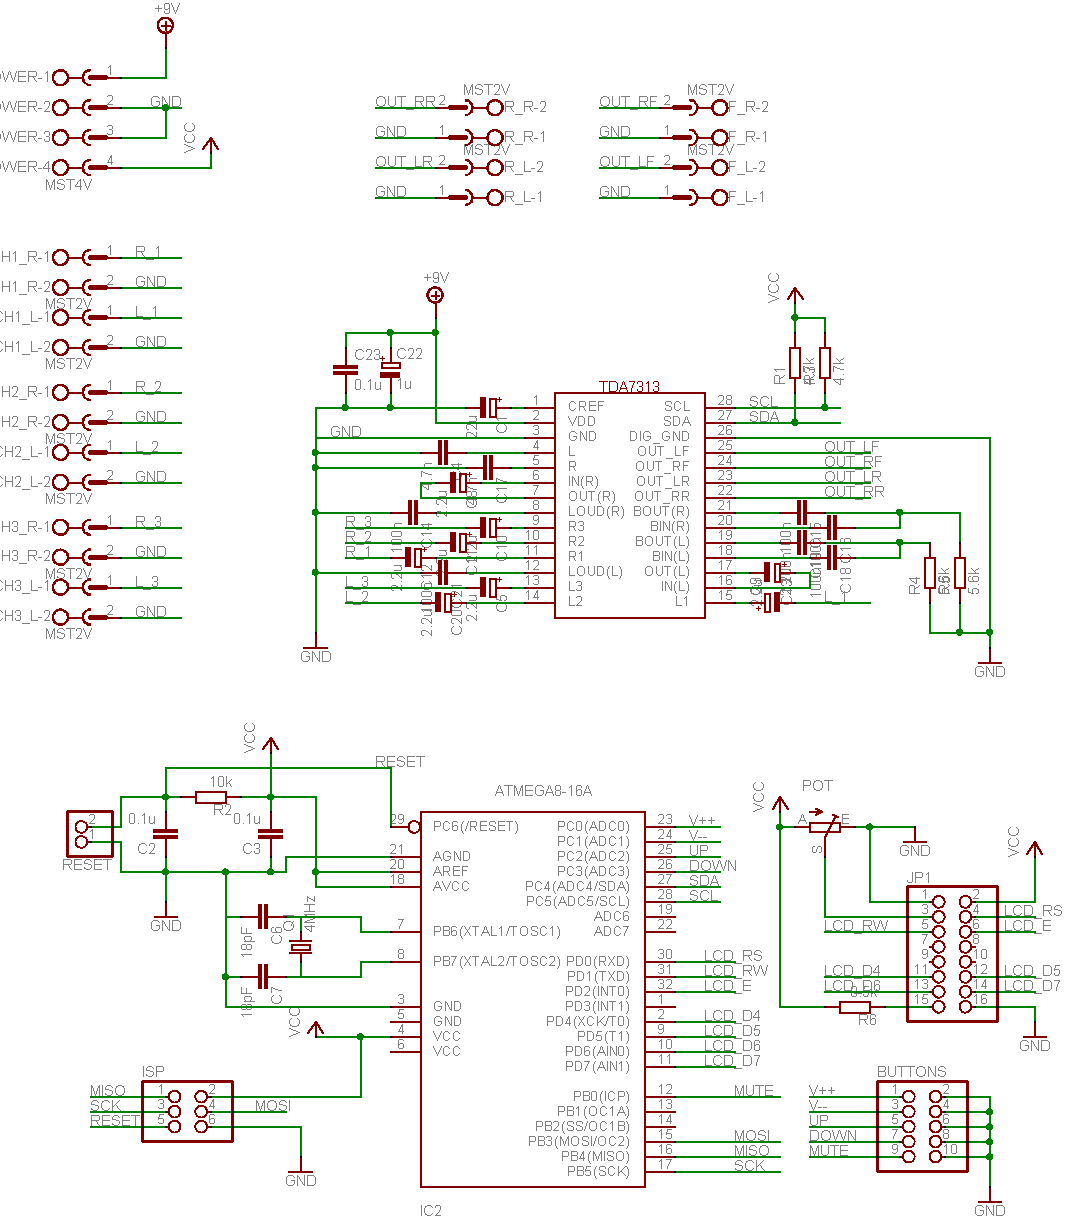
The Control board was projected in a single-sided PCB board, making it easier and simpler to reproduce it.

Here is a prototype board with buttons and LCD connected.

Some mistakes found onboard are already corrected and included in the newest project files.
Firmware design
Firmware writing is always the most interesting and time-consuming task. The idea was to implement a menu system that allows controlling all parameters of the audio processor:
- Volume [-78.75dB to 0dB] + Mute;
- BASS [-14dB to 14dB];
- Treble [-14dB to 14dB];
- Channel select [Ch1, Ch2, Ch3];
- Input Gain for selected channel [0dB to +11.25dB] +Loudness;
- LF speaker attenuation [-38.75dB to 0dB];
- RF speaker attenuation [-38.75dB to 0dB];
- LR speaker attenuation [-38.75dB to 0dB];
- RR speaker attenuation [-38.75dB to 0dB];
For this linear menu system was implemented where the parameter is expressed as a progress bar except channel select:

Control is done with specially oriented buttons:

[Up] and [Down] buttons are used to navigate in the menu, [+], and [-] buttons are for the change parameter value. Hold the [+] or [-] button for a longer time, and the parameter is increased continuously. [Mute] button is used to mute signal when the active menu is Volume and set Loudness when the active menu is Input gain. Mute and Loudness settings are indicated in the Volume menu as MT and LD strings.
There you can download menu simulation Proteus files (menusimulation.zip). The archive includes Proteus_LCD.DSN file (tested with Proteus 7.1 SP2) and main.hex file that has to be loaded into the model.
The system stores current parameters in Atmega8 internal EEPROM, so each time the Audio processor is powered, it remembers the last settings. Parameters are saved to EEPROM after <60 s of previous menu inactivity.
Watch video of menu control:
Fully functioning compiled firmware, WinAVR ready source files, and Eagle project files can be downloaded here (audioproc.zip). If the circuit is assembled correctly, it should work at once.
Conclusion
Hardware and software seem to be working OK. Signal output was inspected with an oscilloscope and with speakers. All functionality works as expected. Audio signal quality on exit depends on power supply stability, be sure to use filtered power supply line for any other sound system.
Don’t try to connect speakers or headphones to audio processor output – you won’t hear anything because output load resistance has to be 2k, so pass through some amplifier if you want to hear sound while testing. I have used PC speakers with a built-in amp.
Recommendations
- The project itself is effortless to replicate. Just build PCB and flash Firmware.hex.
- If you need a smaller board, then you should think of a double-sided PCB.
- The program source isn’t optimized very much – all based on if, else – I think there are many ways to make it more compact and more readable – but maybe next time. Feel free to modify the project – send a note of your version.
Have fun.
hey
i am a newbie for this site and iam wondering about ur projects, those are interesting nd wonderful projects. electronics is my hobby from my childhood
but still i am in begining stage about microcontroller , microprocessor and its programing.
i hav searched thrrought internet to get basic + step by step tutorial for how to program these chips
if u know any tutorial links plz let me know ? and also i hav seen ur project AVR based TDA7313 audio processor project its very wonderfull project but i need to make this circuit to control by a remote controller at while having buttun control too, so hav u done any project like this ? or how to modify this circuit to connect a remote control ? i need this circuit for my school project. will u favor plz give helpfull information and source codes for my school project. i will more thank ful to u , u can contact me (vigneshrajive at gmail . com)
I think it great for experimenter, but I still prefer use computer based audio processor. It give litte bit delay but I have a lot of free VST plugin for the effect.
gmmm i am having some issue gettng the i2c out with the firmware present here.. ( get a blank box withe i2c debugg tool in isis (proteus vsm))
why could some one answere it.. and the hex fill called TDA7313.hex is not respondng to key press
hy coud you make some modification of firmware to support select impout chanel directley from buttons 3 buttons conect at PB1 and PB2 ant another mutiplexer with 2 diodes
hey
i tried to burn this progrm in mega8A and didnt run could some one put instructoins as to how to burn the mega8 chips
thanks
i want to make this project but prob is:
what are the inputs like tda7439 has 4 stereo input but connectors are 3 pin stereo socket(general ear phone connectors) how can i give sound to whole device n than make changes?
so wat is the input like which devices i have to connect?? n 1 stereo output(so dt is simply connect to ear phone to hear changes like bass treble?)
tda7439 is MUX for 4I/P to 1 o/p????
I would like to make it with 8051 microcontroller.
February 27th, 2008 at 11:37 am
hey
i am a newbie for this site and iam wondering about ur projects, those are interesting nd wonderful projects. electronics is my hobby from my childhood
but still i am in begining stage about microcontroller , microprocessor and its programing.
i hav searched thrrought internet to get basic + step by step tutorial for how to program these chips
if u know any tutorial links plz let me know ? and also i hav seen ur project AVR based TDA7313 audio processor project its very wonderfull project but i need to make this circuit to control by a remote controller at while having buttun control too, so hav u done any project like this ? or how to modify this circuit to connect a remote control ? i need this circuit for my school project. will u favor plz give helpfull information and source codes for my school project. i will more thank ful to u , u can contact me (vigneshrajive at gmail . com)
which LCD i should use to this project? please write some standard types working with this project please
Thank you for sharing the project! I’m planning to use the TDA7313 chip with PIC microcontroller for a similar project with infrared remote control, and the source code will be really helpful.
Hi.
I am from Poland and I found this article very interesting. I would like to ask a question: Could I apply an encoder and what I must change in schematic to apply this component? Please answer my question asap.
Sorry for my English.
Love.
From schematic point of view change would be minimal. There are five buttons and encoder with push function needs only three wires. But software would need some change. It’s been written long time ago and is really almost unreadable. But basically menu control part should be rewritten in to more modular and clean manner. And sadly I don’t have this board around any more.
dear sir
settings of fuse bits?
If you are familiar with AVRDUDE:
-U lfuse:w:0x7d:m -U hfuse:w:0xd9:m
thank you sir.
working fine. problem is pop when changing input,(audio switch)…
thank you sir.
@science prog
thanks to science prog
To ScienceProg
Thanks for the reply. I want to connect this encoder to PC0 and PC1, central pin to 5V supply and I want to modify the program for encoder with bouncing junctions. It is good or not?. Please, write me back asap. Love.
It should work. But as I said, program needs re-factoring. Now it’s a big mess.
Hello,
Thank you for your interesting project, I’m planing to do something similar with a TDA7315, do you think using AOPs for input and/or output buffering would be useful ?
Sorry, by AOPs I meant op-amps.
Hi,
Do You have the program writing in BASCOM?
Hello
Have just looked at the schematic of this project and the PCB and seems like they do not match as in schematic the xtal and 2 caps are missing as the button pins, IR pin.
It’s an old project. Hard to tell because I don’t have the board any more. But most likely I have used internal oscillator instead of crystal – clock was sufficient to communicate with audio processor. You are welcome to improve it.
Hello sir , my question is which file i have to burn into mcu there are two files 1.tda7313.hex and 2.main.hex,i first burnt the tda7313.hex it worked but does not respond to key press ,so is it the main.hex file which i have to burn? And why are the fuse bits set for?