Monthly Archives: September 2006

Really cheap USB oscilloscope, spectral analyser, logic analyser and generator

Check this out the new cheap handy tool for multi purpose works. Poscope is affordable (now for 70EUR) instrument that includes:

  • 2 channel Oscilloscope with markers, triggering, filtering etc.;

  • 2 channel Spectral analyser with markers, filtering etc ;

  • 2 channel Chart recorder with markers (up to 99), recording with up to tens of hours etc;

  • 16(8) channel Logic analyser with markers, various triggering, external clocker, decoding UART, SPI, I2C 1-wire interfaces;

  • 8 channel Logic generator with ability to plot signal with mouse, etc.;

  • Coming Square generator.

Cheap_osciloscope.jpg

As it is said this is handy and cheap tool for researching any electronic devices. The parameters arent very high – as oscilloscope sample rate is up to 200kHz, but for most hobby purposes this is enough.

Interface is simple and easy understandable:

usb_scope_interface.png

Additionally this scope is able to save results to vector graphic or BMP format, print results, copy to buffer, save events and sounds, calculate and perform filtering, display statistics for all channels. Device is upgradable with future features and bug fixes. Read more in PoScope developers site.

Moving from PonyProg to AvrDude AVR programmer without pain

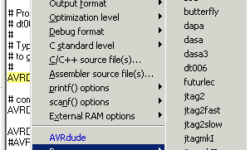
Probably PonyProg is one of the most popular programming software among AVR microcontroller developers. And this is OK as it is good software with very intuitive interface and support many chips like Atmel AVR, Microchip PIC micro, I2C, Microwire, SPI EEPROM. It works well with AVR ISP adapter which is ease to build. This is ideal tool for low budget projects.

The only thing what I don like with it, that I need to do additional steps to program AVR chip:

  • Compile project with WinAVR;

  • Open hex file with PonyProg;

  • Programm the chip;

Then I thought – what if I could build and program the AVR chip with single button press. This is where AVRDUDE comes in.

AVRDUDE is a FreeBSD Unix program for programming Atmel’s AVR CPU’s. It can program the Flash and EEPROM, and where supported by the serial programming protocol, it can program fuse and lock bits. AVRDUDE also supplies a direct instruction mode allowing one to issue any programming instruction to the AVR chip regardless of whether AVRDUDE implements that specific feature of a particular chip. AVRDUDE can be used as a command line tool (convenient tu use with makefiles) or interactively via terminal. It can program microcontroller’s flash, EEPROM, fuse bits, modify individual bits, explore memory contents etc. For additional information refer to AVRDUDE manual.

Lets try to set up AVRDUDE to work in Windows environment. As I am using Windows XP I need to set up port drivers to enable AVRDUDE direct acces to ports. For this in a AVRDUDE package is handy tool included: install_giveio.bat which copies needed driver files to windows directory. For this just run:

C:\WinAVR\bin>install_giveio.bat
Copying the driver to the windows directory
target file: C:\WINDOWS\giveio.sys
1 file(s) copied.
Remove a running service if needed…
Installing Windows NT/2k/XP driver: giveio
installing giveio from C:\WINDOWS\giveio.sys… ok.
starting giveio… ok.
set start type of giveio to auto… ok.
Success

After this installation you can check driver status by writing command:

C:\WinAVR\bin>status_giveio.bat
status of giveio:
Type: [0x01] Kernel driver.
Start Type: [0x02] Automatic
Error Control: [0x01] NORMAL: Display a message box.
Binary path: \??\C:\WINDOWS\giveio.sys
Load order grp:
Dependencies:
Start Name:
ok.

When port drivers are set up, then wee can do couple fun tests with your AVR microcontroller via same AVR ISP cable that we use with PonyProg. No any changes is needed as this programmer is supported by AVRDUDE.

Just open console window and write command line:

C:\WinAVR\bi>avrdude -p m8 -c pony-stk200 -e -U flash:w:demo.hex

….

This command line programs your Atmega8 flash memory with demo.hex contents using simple AVR ISP adapter.

Well lets make this happen when building WinAVR project in Programmers Notepad editor. For this we need to prepare Makefile. The easiest way to do this is to use Mfile utility, where you can select programmer type and port:

Mfile_Avrdude_setting1.PNG

You should have following results in makefile:

Mfile_Avrdude_setting2.PNG

Thats it. Now is a fun part. If you have your project ready to run, just select “Program” command from Tools menu in PN:

AVRDUDE_programming.PNG

This command builds your project and automatically sends hex file to AVR microcontroller automatically. In a future there will be more real world examples how this is working. Don’t afraid to read documentation – al is written there ;)

Good luck.

New AVR Studio 4.12 Service Pack 4 have been released

As we know AVR microcontroller family is expanding very fast including new microcontrollers. So development tools has to catch up with them. Atmel has released 4′th release of service pack of AVR Studio 4.12. This includes few major updates and fixes. As usually latest update include all previous updates that we wouldn’t have to bother with updating one by one. Lets see what we have new this time:

- Software, Firmware, User Guide, and part support updates for AVR Dragon.

- Firmware update for the JTAGICE MKII.

- Firmware update for the STK500.

- ATmega644P (AVRISP,STK500,JTAGICE MKII,SIMULATOR,AVRASM2,ICE50)

- ATmega329P (AVRISP,AVRISP MKII,STK500,JTAGICE MKII,AVR DRAGON, SIMULATOR, AVRASM2,ICE50)

- ATmega3290P (AVRISP,AVRISP MKII,STK500,JTAGICE MKII,AVR DRAGON, SIMULATOR,AVRASM2,ICE50)

- ATmega325P (AVRISP,AVRISP MKII,STK500,JTAGICE MKII,AVR DRAGON, SIMULATOR,AVRASM2,ICE50)

- ATmega3250P (AVRISP,AVRISP MKII,STK500,JTAGICE MKII,AVR DRAGON, SIMULATOR,AVRASM2,ICE50)

- General bug fixes for simulator, assembler, JTAGICEmkII

Well… Windows 95 is not supported by AVR Studio 4 from SP3 and SP4

Download AVR Studio 4.12 Service Pack 4 it’s free.

Using LPC2000 flash ISP utility to program LPC2148

As I earlier was writing about my home made ARM7-Base development board for LPC2148

ARM_Developement_board.jpg

It is time to write few words on how to use LPC2000 flash ISP utility.

LPC2000 flash utility is a software which is used to program LPC2000 series ARM microcontrollers:

LPC2101, LPC2102, LPC2103, LPC2104, LPC2106, LPC2106, LPC2114, LPC2114, LPC2119, LPC2124, LPC2129, LPC2131, LPC2132, LPC2134, LPC2136, LPC2138, LPC2141, LPC2142, LPC2144, LPC2146, LPC2148, LPC2194.

Programming is done through serial port. As you probably know, the LPC2000 series microcontrollers comes with boot-loader built in. This bootloader provides ISP interface for programming Flash or Ram memories and other operations like erasing. Bootloader is located in upper 8kB flash memory.

Bootloader has an algorithm which detects incoming ISP connection, detects baud rate automatically.

When starting ISP after reset P0.14 has to be pulled down what means that microcontroller is ready to accept ISP commands. Otherwise keep P0.14 pin pulled high to avoid unintended ISP entry.

Lets take a look at main screen of LPC2000 flash utility:

LPC2000_screen.JPG

The program has very intuitive screen. First thing what you have to do is to power up your target board, connect serial cable to your computer. Then in a screen select COM port number and baud rate. If you use automatic ISP entry mode, then check DTR/RTS checkbox – in a board DTR and RTS lines has to control P0.14 pin and RESET pin. Otherwise use manual entry mode.

If “execute code after upload ” is selected, then after programming completes – an extra reset pulse is sent to reset microcontroller.

Next step you have to enter crystal frequency in kilohertz’s. After this press “Read Device ID” to make sure that device is detected correctly. Part ID and boot-loader ID is detected. If successful you can now start programming you microcontroller.

Open hex file and press “upload to flash” to send code to microcontroller. “Compare flash” button is used to compare original hex file contents with uploaded. This operation is possible if checksum is part of hex file already.

Checksum can be generated as follows:

Open buffer menu and select “Flash buffer operations”:

LPC2000_Flash.png

Press “load hex file” and select hex file you need to upload to microcontroller.

Press “Vector Calc” to generate checksum which will be located at the address 0×14. You will notice how this area updates after you press this button. Now you can save hex file back to its location by pressing “Save Hex File”.

Now press “Download Flash” to download hex data fro mmicrocontroller.

In a main window press “Compare flash” to compare flash contents and original hex file.

There is also SRAM buffer operations available – pretty same as flash buffer. You can download microcontroller RAM contents, modify and send back to microcontroller.

You can also run program code from selected address location, fill buffer with some values and so on.

Other types of ARM microcontrollers like LPC2220/2210/2290 are not supported by this utility as these microcontrollres don’t have inner flash memory. But utility can be used because it can send ISP still can access SRAM memory, read device ID. Just ignore Error message and go ahead.

AVR DDS signal generator V1.0

Sometimes when tuning various electronic hardware we need simple signal generator with various waveform and frequency. One of the options is to by a professional with variable gain professional coating and many additional functions. But if you are an amateur you might want to build one. This small project is dedicated for building one of those signal generators.

LCD_Panel


Specification

AVR DDS signal generator consists of following parts:

  • Atmel Atmega8 8 bit microcontroller;
  • Supply source and voltage regulator;
  • 2×16 standard LCD and shift register 74HC164;
  • 7 buttons;
  • R-2R resistor leader for DAC;
  • Three outputs: universal(OUT) from DAC, PWM and pulses;
  • Metal case;
  • and microcontroller firmware.

Atmega8 microcontroller is a simplest of atmega series. There is 8kb of FLASH program memory, maximum frequency is 16MHz, which is used to reach DDS generators maximum resolution at maximum frequency. For know frequency is limited from 1 to 65535Hz with minimal step of 1Hz.

DDS AVR generator is powered with 9V battery. Voltage is reduces to 5V and stabilized by 7805 voltage regulator.

LCD is controlled using three wires through shift register 74HC164. So this register is used as serial to parallel converter in order to save microcontroller pins. LCD is controlled in 8 bit mode.

AVR DDS Generator uses 7 control buttons:

  • Start;

  • Stop, which is a reset also;

  • IP- increasing value;

  • DOWN- decreasing value;

  • Mode1 – signal selection button;

  • Mode2 – signal properties;

  • Freq – signal frequency multiplier selection.

  • Buttons on the box

AVR DDS signal generator uses R-2R digital to analog (DAC) converter This is a simplest solution where resistors are connected in a ladder:

R-2R_ledder


In this schematic R=10kohm. By using 8 bits and 5V step value is about 18.5mV. This is enough for getting average quality signals.

Generator has three outputs:

  • Universal DAC output through R-2R ladder;
  • PWM;
  • Impulse (SQ);

Universal output (OUT) is a signal output from DAC. This output is to form various signals like sawtooth, sine, square, triangle.

PWM channel is used to form for PWM signal output – directly from timer.

SQ channel is additional channel to form square pulses or second PWM signal. Will be implemented in future.

AVR_DDS_diagram


In the block chart is described the structure of AVD DDS signal generator. You can se the signal paths. Each block part is described in specification.

Menu and program stages:

After generator is switched on the message is displayed in LCD: LCD SCREENS


„Mode2“ button selects the step of frequency from 1 to 10000Hz by pressing it in series. “Up” and “Down” buttons change the frequency value by step value.

After “Start” button is pressed – last settings are saved in EEPROM and signal generation is started.

Above functionality is implemented and tested. In a future plans there are few more signal generation modes. By pressing “Mode1” you can see following screens whish may change a little during implementation:LCD Screens1


Circuit diagram and PCB

PCB is single sided with some wiring done in top side.

pcb.jpg

schematics.png


Circuit diagram explanation:

Microcontroller port pins are connected to:

  • R-2R DAC is connected to D port pins 0…7;
  • Shift register data line is connected to C port’s 0 pin;
  • Shift registers synchronize line is connected to port C pin ;
  • LCD screen’s E signal is controlled by C ports pin 2;
  • Start button is connected to B port pin 0;
  • Stop button is reset button;
  • Up button is connected to port B pin 3;
  • Down button is connected to port B pin 4;
  • Mode1 button is connected to C port pin 3;
  • Mode2 button is connected to C port pin 4;
  • Freq button is connected to C port pin 5;
  • SQ signal is coming from AVR b port pin 2;
  • PWM signal comes out from Port B pin 1.

Part list (exported from eagle):Parts List

Tools used

In developing this AVR DDS signal generator There were following tools used:

Software:

Hardware tools:

Few words about firmware

Program is written in C language and can be compiled with WinAVR20060421 toolset. Programming is done by using AVR ISP and PonyProg programming software.

Program flow in few words:

When AVR DDS generator is switched on:

  • Initialization of LCD;
  • Reading previous settings from EEPROM memory and displaying to LCD;
  • Using buttons settings and signals can be changed. When “Start” button is pressed, new settings are saved to EEPROM and signal generation starts.
  • Note: After power up you can press “Start” to start last saved signal generation immediately;
  • Generator is stopped by pressing Stop button which resets the generator. After Reset generator again loads its lasts configuration from EEPROM memory and is ready to start new generation.

EEPROM memory stores following data:EEPROM data

Mode values:

  • 0 – OUT_|¯|_;
  • 1 – OUT|/|/|;
  • 2 – OUT|\|\|;
  • 3 – OUT/\/\/\;
  • 4 – OUT~~~~;
  • 5 – OUT-NOISE;
  • 20 – PWM-OCC;
  • 21 – PWM-SINMDS;
  • 22 – PWMSQSMDS;
  • 23 – PWM-CMDS;

Frequency value is divided to 3 EEPROM bytes. Because max theoretical frequency is 16MHz whis hexadecimal value is 0XF42400:

Freq[23...16]

Freq[16...8]

Freq[7...0]

Duty value is from 1 to 99 in percents.

Program Structure:

LCD_3w.h – LCD settings

LCD_3w.c it contains LCD control functions

  • void sendByteToRegister(uint8_t);
  • void LCDenableCommand(void);
  • void LCDdisableCommand(void);
  • void LCDenableData(void);
  • void LCDdisableData(void);
  • void LCDsendChar(uint8_t); //forms data ready to send to 74HC164
  • void LCDsendCommand(uint8_t); //forms data ready to send to 74HC164
  • void LCDinit(void);
  • void LCDwritebyte(uint8_t, uint8_t);
  • void LCDdefinechar(const uint8_t* ,uint8_t);
  • void LCDclr(void);
  • void LCDhome(void);
  • void LCDstring(uint8_t*, uint8_t);
  • void LCDGotoXY(uint8_t, uint8_t);

main.c – main program text where:

  • signal tables are stored;
  • messages to LCD are described
  • EEPROM initialization is done;
  • changing parameters are implemented;
  • signal generation (using in-line ASM routines) is performed.

Testing

For now testing is done by using frequency counter and Oscilloscope. In a frequency range of 1 to 65535Hz works OK. There can be greater frequency range programmed but with less resolution. I think for audio equipment testing there is more than enough frequencies.

AVR_DDS_Signals

Discussion

As I mentioned earlier, this is a first trimmed version of AVR controlled generator. It has half of working functionality in many cases this can be enough. Main signals are generated and can be controlled. In a future the functionality can be expanded to add PWM generation using timers. Generator generates signals as they are – directly from DAC. There is no variable gain regulation. To be more interesting project there can be VGA amplifier used with feedback to control output signal voltage. The project source code is open to modify and expand functionality. If there will be some good modifications – feedback is always welcome.

You can download AVR DDS Documentation and AVR DDS Source files as they are.

More pictures from the project:

AVRDDS1 AVRDDS2

AVRDDS3 AVRDDS4

AVRDDS5 AVRDDS6

AVRDDS7 AVRDDS8

Download Eagle project files

Some software writing ideas were taken from Jespers Mini DDS.


Piconomic Design-easy start with 8 bit AVR microcontrollers

Piconomic Design company has decided to release condensed course of 8 bit AVR microcontrollers by example. This is good start to people who want to start or switch from different MCU platform.

They have introduced simple development board which can be built abd used freely for personal use. You can purchase the bord if you are from A South Africa.

avr_developement_board

In Piconomic Design web page you will find a development board files in different formats:

Board features are:

  • ATmega128L microcontroller with 7.3728 MHz crystal and 32.768 kHz RTC ;

  • 250 kbps RS-232 Transceiver with hardware flow control (RTS/CTS);

  • 1/8 UL, slew rate limited, 250 kbps RS-485 Transceiver;

  • 4 Mbit serial DataFlash with SPI interface;

  • 100 mil pitch Headers: JTAG, ISP, GPIO, SPI, ADC, I2C, XMEM;

  • User Interface: power and user LED, reset and user button, buzzer;

  • +6V to +9V DC power socket with reverse-voltage protection diode.

In web page you will also find:

  • A bootloader for the ATmega128 that accepts abinary firmware file using the XMODEM-CRC transfer protocol.

  • A set of tutorials of fundamentals AVR in C.

  • A firmware framework that exercises some of the peripherals of the development board and can be re-used for rapid application development.

In page directly you will find the very basics of how to start working with WINAVR and some C statements. This is a good source to learn.

Stimuli Generator for AVR Studio helps debugging programs in AVR Studio

Stimuli Generator for AVR Studio is a handy programa which allows making stimuli files for AVR Studio. These files contains information of signals that can be used to affect AVR microcontroller pins virtually. With Stimuli Generator you can emulate any interfacing like I2C, SPI and other- this allows to emulate real world situations.

Working of program is simple: set target microcontroller (by default 8MHz), set measurement unit- microseconds or mili-seconds. For instance you want to send signals to Pin0 of PORTB. Target MCU -ATMega8 which runs at 4MHz. Set serial interface protocol which is like: start bit length – 60us, bit 0 – 20us, bit 1 – 40us. Si in this case step value would be 20us. Step value will depend on what variation on duration of impulses.

Stimuli-Generator-Screenshot

Signal drawing is done with mouse pointer. Mouse pointer indicates signal level to be drawn (arrow up or down). Set signal level by clicking mouse.

Workplace interface is quite convenient. You can zoom – stretch time line. You can mark specific areas of signals like bytes and so on.

Integration with AVR Sturio is simple. Saved stimuli file add to your AVR project. How to work with this file it is well documented in AVRStudio documentation.

Download Stimuli Generator its free.

Stimuli Generator for AVR Studio for .NET Framework 2.0 (112KB)

Stimuli Generator for AVR Studio for .NET Framework 1.1 (108KB)

Program is free, but if you like it don’t forget to donate its authors.


Place electronics parts correctly on PCB

Lets go through few examples how to place electronic parts correctly on PCB board.

SMD electronic parts especially if lead pitch is above 1 mm, then placement of leads has to be symmetrical on copper planes:

SMD_Placement

If IC has smaller lead pitch like 0.5 – 0.8mm positioning by hand become harder. Sometimes it is recommended to use special glue to fix SMD part before soldering.

DIP electronic parts has to be soldered as close to PCB board as possible to make them stand stabile and to avoid heat resistance.

DIP_Part_placement

Electronic parts with axial leads are placed vertically for better air ventilation. Because of this diodes and Zener diodes has to mounted with cathodes up with gap of 1-2 mm between electronic part and PCB board. If there is enough place – they can be mounted horizontally. This way between electronic part and PCB has to be a gap of about 1 – 2 mm.

Electronic_part_Placement

Single side pin electronic components like ceramic, electrolytic capacitors, crystals, semiconductor fuses have to be placed with minimal gap (about 1 mm) between PCB.

H49U crystals have to be placed with minimal gap between PCB. It under resonator there is no via holes or tracks, then it is better to solder them without gaps. Crystals with high packages H49 it is better to bend them towards PCB with Ground plane. It is recommended to glue side of crystal to PCB.

LED’s with diameter of 5mm it is recommended to mount close to PCB without gaps. Miniature LED’s (diameter of 3mm) are mounted at the fixed length left on leads.

Led_mounting

Bigger electrolytic capacitors can be mounted close to PCB or bended:

Electrolytic_capacitor

Mechanical parts like buttons, jumpers, LCD usually have fixers or screw holes to be fixed to PCB. In other cases parts have to be fixed tightly closer to PCB.

Drive dot LED matrix display using LPT port and driver IC

It is convenient to drive dot LED matrix displays using IC drivers of 5×7 dot LED matrix’s like MAX6952 and MAX6953. These two IC’s differ only by data interfaces: SPI for MAX6952 and I2C for MAX6953. In this article you will se how these driver IC’s can be controlled by computer using LPT port.

Program provided here works with almost all Windows versions: 95, 98, 98SE, ME, NT, 2000 and XP. Printer ports can be used are LPT1 and LPT2. Program is called MAX6952 and it is programmed by using Visual Basic 5. To be able start this program you will ned few standard VB run time libraries: MSVBVM50.DLL. Program uses freeware driver of parallel port: DriverLINXTDLPortIO.DLL which is responsible for hardware I/O in win32.dll and are not accessible by standard VB. Windows NT and windows 2000/XP require driver too. It is DLPortIO.SYS. Both drivers are owned by Scientific Software Tools, Inc . DriverLINXT is registered trademark of Scientific Software Tools, Inc.

Firs of all installation on win98. Download file MAX6952-95.exe (793kB). This is self extractin archive which contains ReadMe.txt, ReadMeSST.txt, MAX6952.EXE, DLPortIO.DLL and MSVBVM50.DLL. By default install directory is C:MAX6952. File MSVBVM50.DLL can be removed if this library is already registered in your PC.

In order to install programm on win NT, win2000/XP, download file MAX6952-NT.EXE(2.378kB). This is self extracting archive which contains: ReadMe.txt, ReadMeSST.txt, MAX6952.EXE, PORT95NT.EXE and MSVBVM50.DLL. By default install directory is C:MAX6952. Program PORT95NT.EXE registers libraries DLPortIO.DLL and driver DLPortIO.SYS which is part of DriverLINX. File PORT95NT.EXE can be deleted after installation. This procedure may be used for win95 and win98.

Now software part is set up let’s move to hardware part. The program above uses 3 and 8 output lines of LPT port for SPI interface simulation and additional 2 lines for I2C interface simulation. One line of port is used for reading blink status. It is possible to control several IC MAX6952 (up to 16 in series) ant one time. You can choose LPT1 or LPT2 within program interface. Port may be working in standard, ECP or RPP mode. Connection circuit bellow:

LED_Matrix_To_LPT

Program window after start up is bellow. Initial state of registers of MAX6952 and MAX6953 are seen here after power up. Select driver type: MAX6952 – SPI or MAX6953- I2C.

LPT_contro_SPI

When are working in SPI mode it is possible to control 16 drivers. Drivers are connected in cascade: DOUT of first driver IC is connected to DIN of second driver IC of MAX6952 and so on.

Number of drivers is defined by slider “Number of Drivers”. When setting up more than one driver – “Enable global driver write” and “Enable auto-increment” check-boxes enables. When “Enable global driver write” is unchecked then during command execution writing is done only to driver which is selected by slider “Current Driver”. If check-box “Enable global driver write” is checked then same data is written to all drivers. If “Enable auto-increment” is checked then driver counter increases automatically. This allows to send different data to all drivers of  Dot LED matrix in series.

After program is started SPI interface can be tested with function “Test Stream” which is located in “PORT Connections and Help…”. “Test Stream” utility continuously sends NOP code to drivers to test them.

When working in I2C mode, program also allows to control up to 16 drivers MAX6953. Firs driver has address of 1010000x following drivers have addresses up to 1011111x. Other control is the same as for SPI mode. Testing is also done by function “Test Stream”:

LPT_control_I2C

Now comes the fun part – “Design User Fonts” this button calls procedure which allows creating and storing User Symbols that will be displayed in dot LED matrix. By default there are pre-built few symbols that are stored in MAX6952_fonts.txt file:

LED_Matrix_To_LPT_screen

Interface is very intuitive. Symbols that you create can be saved to file or sent to drivers of dot LED matrix.

Data file format is as follows:

Font 0Data 00011100Data 00011100Data 00011100Data 00011100Data 00011100
Font 1Data 01111111Data 01111111Data 00111110Data 00011100Data 00001000
Font 2Data 00000000Data 00000000Data 01111111Data 00000000Data 00000000...

Font xx – shows font number where xx can be from 0 to 23;

Dataxxxxxxxx – one row of 8 bit data for dot LED matrix (up to 7 rows for one symbol);

Data is saved fro MSB to LSB which describe symbol.

New generation ICprog-AVR2.0 showed up

Icprog-AVR2.0 is a new generation USB AVR microcontroller programmer. The ICprog AVR is the smallest USB Programmer for Atmel AVR Microcontoller, available at the market. The version ICprog AVR 2,0 programs with almost double programming speed like conventional programming adapters!

Programmer is AVR910 compatible. Two versions of programmers are available:

6-Pin Version with standard AVR910 6-pin header

ICprog-AVR2.0

10-pin Version with KANDA interface

icprog2_kanda

USB programming software: AVR AVR-Studio of Atmel (AVR Prog) and compatible

pin allocation: 2 different (autodetect)

current supply: over USB quantity

L x B x H (mm3): 38.7 x 23,1 x 14,6

AVR microcontrollers supported:

ATmega:
ATmega48, ATmega88, ATmega168, ATmega8, ATmega16, ATmega32, ATmega64,
ATmega103, ATmega128, AT90CAN128, ATmega1280, ATmega1281, ATmega640,
ATmega161, ATmega162, ATmega163, ATmega169, ATmega164, ATmega324,
ATmega644, ATmega329, ATmega3290, ATmega649, ATmega6490
ATmega8515, ATmega8535
ATtiny:
ATtiny10, ATtiny12, ATiny13, ATtiny15, ATtiny26, ATtiny2313, ATtiny25, ATtiny45,
ATtiny85, ATtiny24, ATtiny44, ATtiny84
Classical:
AT90S1200, AT90S2313, AT90S2323, AT90S2333,
AT90S2343, AT90S4414, AT90S4433, AT90S4434,
AT90S8515, AT90S8534, AT90S8535, AT90S8544

For programming the free AVR studio is recommended by Atmel with the Tool AVRprog contained in it. Alternatively e.g. AVRDUDE can be used (Download on this side). The two LEDS on the Programmer are for control purposes – one shines if the Programmer by USB to the PC is attached and the other one during the programming process.

New on WinAVR Tutorial New on WinARM Tutorial